A V-shaped look is usually created by a mix of skin firmness, facial muscle tone, and the appearance of reduced puffiness along the jawline and cheeks. An at-home facial lifting device can support a more sculpted look when used consistently, paired with good skincare and realistic expectations. This guide explains how these devices are typically used, what to look for in features, how to use them safely, and how to build a simple routine for visible tightening over time.
What a V-Shape Look Actually Depends On
- Skin elasticity: Collagen and elastin help skin bounce back; elasticity naturally changes with age, sun exposure, and lifestyle.
- Soft-tissue appearance: Puffiness and fluid retention can blur the jawline, especially after high-salt meals, poor sleep, or hormonal shifts.
- Muscle tone and posture: Masseter tension, neck posture, and facial habits can influence facial contours.
- Fat distribution: Natural facial fat pads and overall weight changes affect cheek fullness and jaw definition.
- Lighting and makeup: Contouring effects can mimic “lift”; device routines aim for gradual, natural-looking refinement.
How Facial Lifting Devices Support Slimming and Tightening
- Temporary tightening effect: Many people notice a short-term “snatched” feel after sessions due to massage, warmth, and improved circulation.
- Ongoing tone and firmness support: Consistent use can support the look of firmness by encouraging regular facial massage and better day-to-day skincare habits.
- Puffiness management: Gentle massage can follow lymphatic drainage patterns, helping reduce the look of morning swelling around cheeks and jaw (learn more from the Cleveland Clinic).
- Better skincare performance: Using a conductive gel or hydrating serum can encourage even application and reduce friction during treatment.
- Realistic results timeline: Visible changes tend to be incremental and depend on consistency (often several weeks), baseline skin condition, and the overall routine.
Key Features to Look For Before Buying
- Comfortable head/roller shape: It should glide smoothly along cheekbones and the jawline without pinching or pulling.
- Multiple intensity levels: A gentle starting point makes it easier to stay consistent, then increase gradually as tolerance builds.
- Heat or warming option (if included): Warming can improve comfort and relax tension, but it should never feel hot or painful.
- Easy charging and handling: Secure grip and simple controls matter—if it’s annoying to use, it’s harder to use regularly.
- Skin-friendly materials: Smooth, easy-to-clean surfaces can help reduce irritation risk.
- Clear usage instructions: Look for straightforward steps and safety guidance; also keep an eye on how product claims are described (see the FDA guide to understanding cosmetic claims).
How to Use a Facial Lifting Device for a Sculpted Jawline
- Start with clean skin: Remove makeup and sunscreen; dry gently with a clean towel.
- Apply slip: Use a conductive gel or hydrating serum so the device doesn’t drag (especially helpful for sensitive skin).
- Use upward and outward strokes: Move from the center of the face outward; along the jawline, glide from chin toward the ear.
- Keep pressure light to moderate: Over-pressing can trigger redness and sensitivity without improving results.
- Time the routine: Short, consistent sessions (5–10 minutes) are often easier to maintain than occasional long sessions.
- Finish with moisturizer and sunscreen (daytime): UV protection supports long-term firmness (the American Academy of Dermatology Association covers practical anti-aging skincare basics).
Simple Weekly Routine for Firming and Puffiness Control
| Goal |
Frequency |
Session Length |
Best Time |
Notes |
| Reduce morning puffiness |
3–5x/week |
5–8 min |
AM |
Use gentle strokes; avoid aggressive pressure around under-eyes |
| Jawline definition support |
4–6x/week |
8–10 min |
PM |
Focus on chin-to-ear glides and cheek lift motions |
| Relax masseter tension |
2–4x/week |
3–5 min |
PM |
Use light pressure near jaw angle; stop if pain occurs |
| Maintenance |
2–3x/week |
5–8 min |
Any |
Pair with hydration and consistent SPF for best long-term look |
Safety and Who Should Avoid Certain Treatments
Common Mistakes That Slow Progress
Product Spotlight: At-Home Tools to Support Your Routine
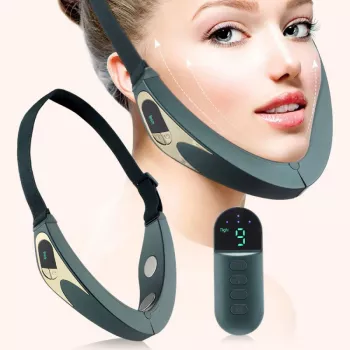
If you want a simple device to build consistent habits, the Facial Lifting Device for V-Shape Slimming and Tightening is designed for at-home sculpting focused on the jawline, cheeks, and overall facial firmness. For the smoothest glide, pair sessions with a slip product like a hydrating serum or conductive gel, then finish with moisturizer (and SPF in the daytime).
Consistency is easier when your routine is organized. If you like keeping skincare notes, printed routines, or aftercare instructions in one place, the 10PCS A4 Hanging File Folder – Colorful Portable Document Organizer can help you store product inserts, weekly trackers, or appointment paperwork so you can stick to a schedule without guesswork.
FAQ
How long does it take to see tightening results?
Some people notice temporary firmness right after a session, especially if puffiness is a factor. More noticeable tightening typically requires consistent use over several weeks, and results vary based on age, baseline skin elasticity, hydration, and how often you use the device.
Can a facial lifting device reduce double chin appearance?
It may help reduce the look of puffiness and support a firmer-looking contour, which can make the area appear more defined. It won’t replace fat loss, genetics, or surgical options, so pairing it with posture improvements and a consistent routine usually gives the most realistic payoff.
How often should it be used for a V-shape routine?
A practical range is 4–6 times per week for about 5–10 minutes per session. Start at a gentler intensity and adjust based on skin sensitivity, adding rest days if irritation or lingering redness shows up.
Recommended for you











Leave a comment